
Simplify your customer integrations with zero-VPN access

Here’s a situation I dealt with recently: A healthmed software company with several medical clinics was coming online and desperately needed a seamless way to connect to their customers' medical office computers and databases. Everyone on the call was clear about the goal: secure, controlled access to the critical systems at these clinics without exposing them to the public internet or relying on VPN setups.
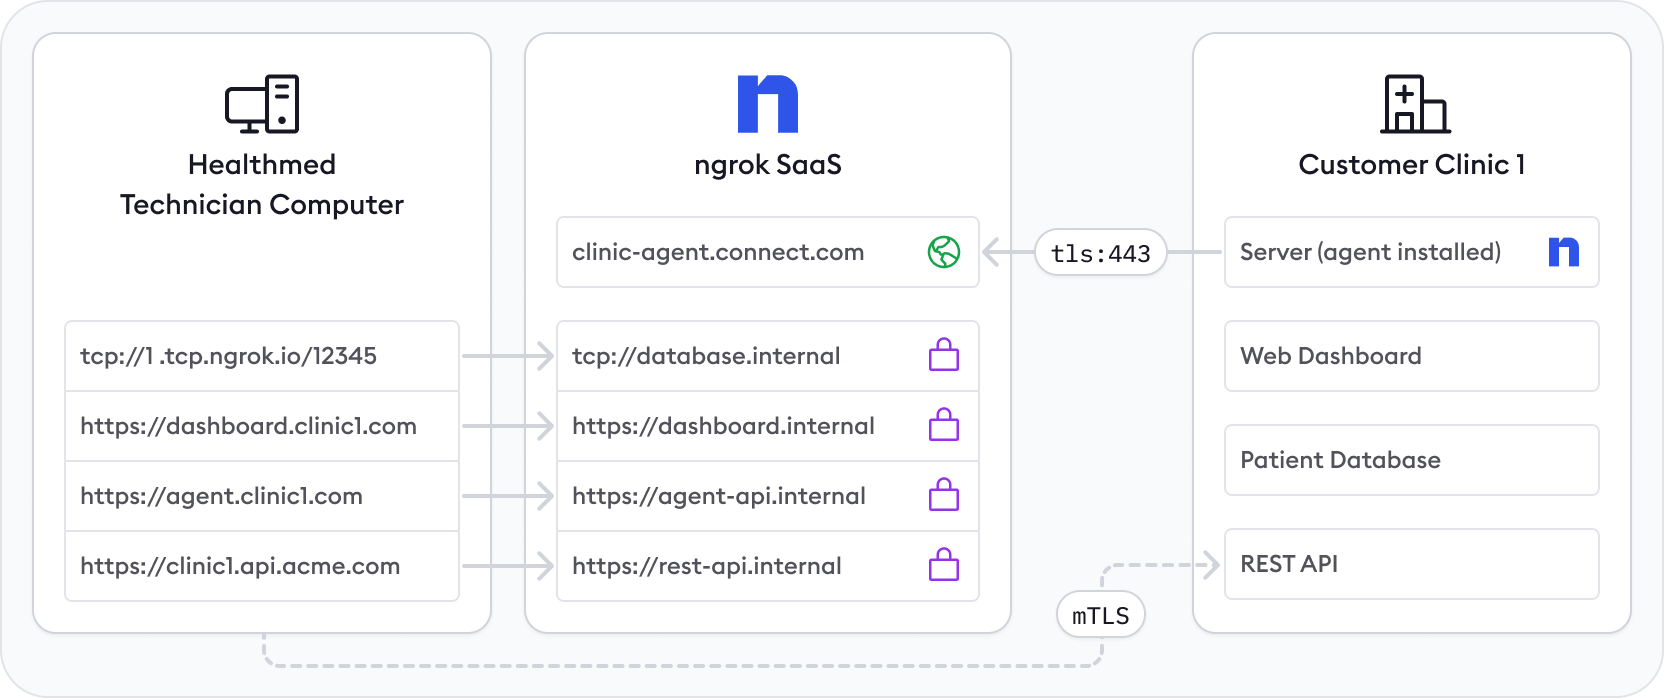
As a customer engineer, I’m on that call to paint the picture of how they can get this kind of site-to-site connectivity network up and running quickly and securely. Here’s the picture I came up with:
Now, let’s go into a deep dive into why and how this works so well not just for tech-rich clinics, but any situation where you need to secure access to a customer's network.
Crafting the perfect shape for site-to-site connectivity
Every site-to-site connectivity architecture has a few shared problems:
- Customer networks block inbound connections, which means there are no public IPs to connect to.
- Technicians need temporary access to dashboards without leaving them exposed.
- APIs and databases on customer networks must remain permanently accessible from the company’s cloud.
- Access to the customer network dashboard must be authenticated via Google OAuth and secured with mTLS.
- The solution must support multiple sites without requiring complex VPNs or multiple agents per site.
In this healthmed company’s situation, they needed to access three key services on each clinic’s network:
- REST API: Streams data to/from the patient database (always accessible).
- Patient database: Stores sensitive patient data (always accessible).
- Clinical web dashboard: Used by technicians for maintenance (only accessible on demand).
By deploying a single ngrok agent per clinic, we can achieve secure, reliable, and dynamically controlled access to all systems within a customer’s network without exposing any internal machines to the public internet.
For this particular set up, I recomment a custom agent and custom agent connect URLs so that customers associate the point of connection with your brand. Connect with our team to get these set up.
Why only one ngrok agent per clinic?
Traditionally, you might assume that every device inside the clinic needs its own ngrok agent, but this is unnecessary. A single ngrok agent is installed on a network-accessible server inside the clinic, and it:
- Acts as a central gateway, able to reach any machine on the local network.
- Creates Internal Endpoints to securely expose each API, database, and dashboard only to ngrok, not the public internet.
- Uses cloud endpoints for controlled, on-demand access to the dashboard.
- Runs as a background service to automatically (re)start and log events.
- Dynamically starts and stops tunnels with the agent API as needed.
This setup minimizes security risks, simplifies deployment, and ensures continuous uptime for mission-critical services.
Understanding cloud and internal endpoints
An internal endpoint enables a service inside the clinic network to be reachable within ngrok, without being publicly exposed.
- Only cloud endpoints or internal services can route traffic to them.
- Cannot be accessed directly from the internet.
- Used for telemetry APIs, databases, and dashboards.
Here’s an example: The clinic’s REST API runs on a local server (192.168.1.100:8080). Instead of exposing it publicly, you can create an internal endpoint:
endpoints:
  - name: api
    url: https://api.internal
    upstream:
      url: http://192.168.1.100:8080
Now, this API is only accessible inside ngrok’s private network.
A cloud endpoint is a permanent, externally accessible entry point into the factory network.
- Managed centrally via the ngrok API or dashboard.
- Does not forward traffic to the agent by default—it must be configured to route traffic to internal endpoints.
- Used for exposing services to external cloud apps securely.
Example: The clinic’s REST API is accessible via https://clinic.example.com/api, but instead of exposing the API directly, a cloud endpoint forwards traffic to its internal endpoint:
on_http_request:
  - expressions:
      - req.url.path.startsWith("/api")
    actions:
      - type: forward-internal
        config:
          url: "https://api.internal
Define internal endpoints in ngrok.yaml
After installing the ngrok agent, define all required internal endpoints inside your ngrok configuration file.
version: 3

agent:
  authtoken: <YOUR_NGROK_AUTHTOKEN>

endpoints:
  - name: rest-api
    url: https://rest-api.internal
    upstream:
      url: http://192.168.1.100:8080  # API inside clinic network
  - name: patient-db
    url: tcp://database.internal:5432
    upstream:
      url: tcp://192.168.1.101:5432  # PostgreSQL database
  - name: clinic-dashboard
    url: https://dashboard.internal
    upstream:
      url: http://192.168.1.102:3001  # Web dashboard
  - name: agent-api
    url: https://agent-api.internal
    upstream:
      url: http://localhost:4040  # Expose agent API internally
Install ngrok as a background service
Now, we install and start the service:
ngrok service install --config /etc/ngrok.yml
ngrok service start
This starts all tunnels defined in the configuration file, ensures ngrok runs persistently in the background, and integrates with native OS service tooling.
Reserve a TCP address to create a TCP cloud endpoint
When you reserve a TCP address, you can create a TCP cloud nendpoint that binds to that domain. You can reserve TCP addresses with ngrok’s pay-as-you-go plan.
curl -X POST \
  -H "Authorization: Bearer <NGROK_API_KEY>" \
  -H "Content-Type: application/json" \
  -H "Ngrok-Version: 2" \
  -d '{"description":"Patientdb Address", "region":"us"}' \
  https://api.ngrok.com/reserved_addrs
Reserve a custom wildcard domain
Creating a custom wildcard domain will allow you to create endpoints and receive traffic on any subdomain of your domain. It can be helpful to create a separate subdomain for each customer site you wish to connect to. You can utilize wildcard domains on ngrok’s pay-as-you-go plan—reach out to support to get access.
curl \
  -X POST \
  -H "Authorization: Bearer {API_KEY}" \
  -H "Content-Type: application/json" \
  -H "Ngrok-Version: 2" \
  -d '{"domain":"*.api.clinicnet.com","region":"us"}' \
  https://api.ngrok.com/reserved_domains
Create a bot user and authtoken for the clinic
Create a bot user so that you can create an agent authtoken independent of any user account. A bot user represents a service account, and allows each customer network to have its own authtoken. In the case one authtoken is compromised, only that customer network may be affected rather than all of them.
curl \
  -X POST \
  -H "Authorization: Bearer {API_KEY}" \
  -H "Content-Type: application/json" \
  -H "Ngrok-Version: 2" \
  -d '{"name":"bot user for clinic 1"}' \
  https://api.ngrok.com/bot_users
Navigate to the ngrok dashboard under Authtokens and create an authtoken for that bot user and assign it an ACL Binding, so that it can only create endpoints bound to the reserved wildcard domain for that clinic’s rest api.

Create cloud endpoints for always-on API and database access
Since the REST API and database must be always accessible, we create permanent cloud endpoints that route traffic to their internal endpoints. First, create an HTTPs cloud endpoint for the API using the ngrok platform API.
curl -X POST \
  -H "Authorization: Bearer <NGROK_API_KEY>" \
  -H "Content-Type: application/json" \
  -H "Ngrok-Version: 2" \
  -d '{
    "url": "https://clinic1.api.acme.com",
    "type": "cloud",
    "traffic_policy": {
      "on_http_request": [
        {
          "expressions": [{ "req.url.path.startsWith": "/api" }],
          "actions": [{ "type": "forward-internal", "config": { "url": "https://api.internal" } }]
        }
      ]
    }
  }' \
  https://api.ngrok.com/endpoints
Now, clinic1.api.clinicnet.com/api permanently forwards traffic to https://api.internal inside the factory.
Next, create a TCP cloud endpoint for the patient database using the ngrok platform API to route traffic to the https://database.internal internal TCP endpoint you already created.
curl -X POST \
  -H "Authorization: Bearer <NGROK_API_KEY>" \
  -H "Content-Type: application/json" \
  -H "Ngrok-Version: 2" \
  -d '{
    "url": "<RESERVED_TCP_ADDRESS>",
    "type": "cloud",
    "bindings": ["public"],
    "traffic_policy": {
      "on_tcp_connect": [
        {
          "actions": [
            {
              "type": "forward-internal",
              "config": {
                "url": "tcp://database.internal:5432"
              }
            },
            {
              "type": "restrict-ips",
              "config": {
                "enforce": true,
                "allow": [
                  "203.0.113.0/24"
                ],
                "deny": [
                  "192.0.2.0/24"
                ]
              }
            }
          ]
        }
      ]
    }
  }' /
  https://api.ngrok.com/endpoints
Now your reserved TCP address forwards TCP connections to the factory database and only allows access from 203.0.113.0/24 and denies traffic from 192.0.2.0/24 using the restrict-ips Traffic Policy action.
Enable on-demand web dashboard access
Since the web dashboard should only be online when needed, we use ngrok’s agent API to dynamically start and stop tunnels.
As a technician, you can start a tunnel with an API request:
curl -X POST \
  -H "Content-Type: application/json" \
  -d '{
    "name": "dashboard",
    "proto": "http",
    "addr": "3001",
    "domain": "dashboard.clinic1.com"
  }'  \
  https://agent.example.com/api/tunnel
Now, dashboard.clinic1.com is live—only for this session.
Secure API access with Google OAuth and mTLS with Traffic Policy
Navigate to your newly created REST API Cloud Endpoint in the endpoints tab on the dashboard, and apply a Traffic Policy. Make sure you have a certificate on hand or generate them using the instructions in our terminate-tls docs.
on_tcp_connect:
  - actions:
      - type: terminate-tls
        config:
          mutual_tls_certificate_authorities:
            - |-
               -----BEGIN CERTIFICATE-----
               ... certificate ...
               -----END CERTIFICATE-----
on_http_request:
  - actions:
      - type: oauth
        config:
          provider: google
      - type: forward-internal
           config:
             url: https://api.internal:443
Welcome to your secure, connected, and automated clinic
You’ve now got a zero-VPN setup that:
- Connects cloud apps to on-prem services—securely.
- Authenticates access with Google OAuth + mTLS.
- Spins up web dashboards only when needed.
- Manages itself with a single agent and the Agent API.
- And yes, runs quietly in the background like a good little daemon.
This architecture gives you full control without the complexity of VPNs or clunky networking gear. It’s reliable. It's flexible. And your customers will never need to think about it (which is the point).
Next steps:
- 🧪 Ready to try it? Start free.
- 🧠 Want to dig deeper? Check out the site-to-site tutorial.
- 💬 Questions, edge cases, tough compliance requirements? Talk to our team—we’ve probably seen it before.
Let’s get your next clinic—or factory, or warehouse, or quirky IoT setup—online without a VPN in sight.
